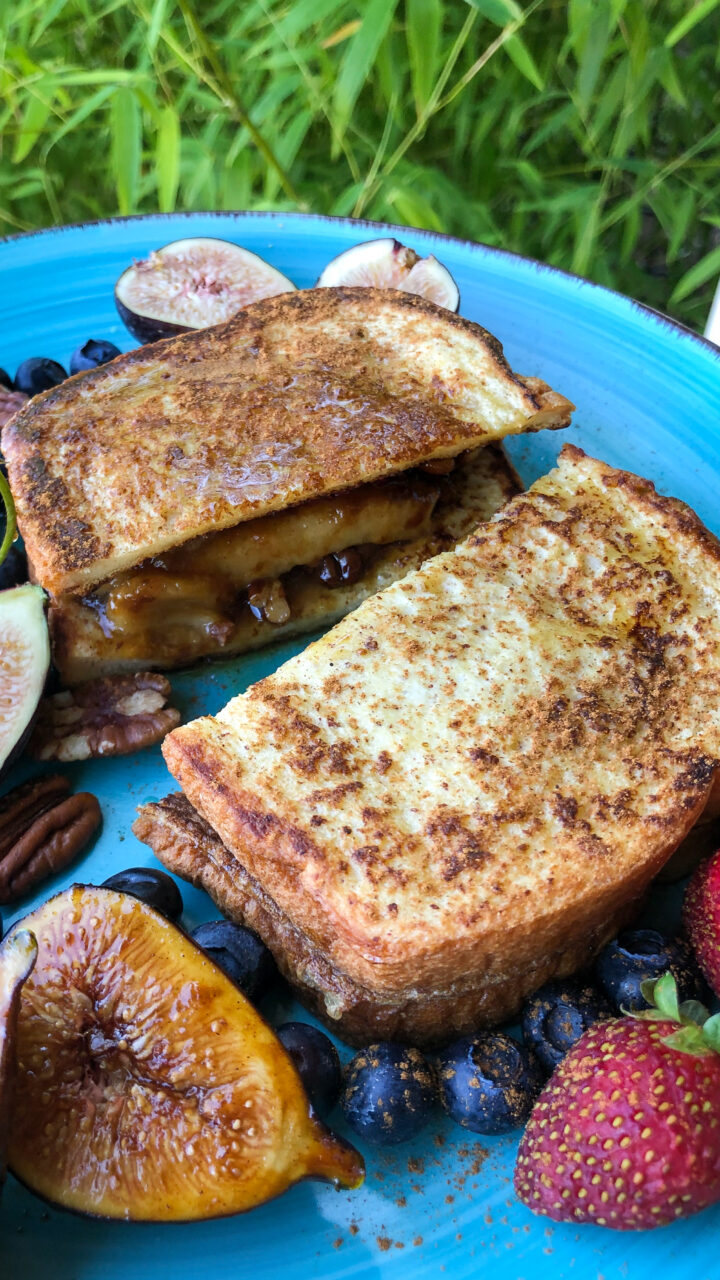
Stuffed French Toast with Bananas is the kind of breakfast that you would also consider a delightful dessert.
Do you like dessert for breakfast? This French toast recipe is for you. Undoubtedly, there’s nothing better than a warm and flavorful sticky breakfast. Furthermore, the combination of flavors in this recipe is to die for! Hence, you can eat these Stuffed French Toast with Bananas any time of the year. Yes, even during summer with a scoop of vanilla ice cream.
Fresh Fruit Tart – Low Carb, Gluten-Free is the perfect summer treat.
This is the perfect dessert for your summer get-togethers. This fresh fruit tart is refreshing, easy to make, gluten-free, healthy, low carb and so delicious.
There’s nothing better than fresh fruits desserts during the summer season. The cream cheese filling of this tart will melt in your mouth instantly. Undoubtedly, this buttery almond crust is perfect for any type of tart. I replaced the all-purpose flour with almond flour and the results were amazing.
Fudgy and rich vegan avocado brownies are better than regular brownies. These are flavorful, spongy, and packed with chocolate and nutrients.
These vegan avocado brownies are healthy, vegan, gluten-free, and refined sugar-free. They are great for breakfast, dessert, or a special treat. Since we should not feel guilty after eating a treat, I added healthy ingredients to this brownie recipe. No one will tell that the star ingredient in this recipe is avocados. I grew up eating avocados and we used them for different purposes. Adding avocados to desserts instead of oil will add a lighter texture to your baked goods. Plus, adding healthy fats is a great idea. These vegan avocado brownies are also great to celebrate any occasion.
These homemade Vegan Almond Joy Cups are made with just a few ingredients, making them the perfect healthy treat or dessert. They have all the flavors of the popular candy bar, including almond, coconut, and chocolate, but these are made with healthy ingredients and loaded with fiber and healthy fats.
I made this recipe using my Puerto Rican Chocolate Covered Coconut Candy – Dulce de Coco recipe, but replaced the sugar for maple syrup and took away the cinnamon and ginger. You can store them in the refrigerator for a week and also freeze them for up to a month.
Here some tips when making these cups:
I used a silicone mold but you can use a muffin tin.
Be patient and let the ingredients harden in the refrigerator before them out of the mold.
If you don’t like almonds replace for any other nut or just skip it.
These Recipe is:
Vegan
Gluten-Free
Refined Sugar Free
Grain Free
Rich and Flavorful
Healthy
Filled with Healthy Fats and Nutrients
Easy to Make
Delicious
Great for treat or dessert
I hope you try this recipe and like it as much as much as I do! If you give this recipe a try, let me know what you think! Leave a comment and don’t forget to take a picture and share it on my Facebook page or tag it #thehungrydragonfly on Instagram! I love seeing your creations!
Line up a baking tray with parchment paper, set aside
In large saucepan over high heat add 1 cup of shredded coconut and sauté until light brown. This step will take a few minutes. Be careful not to burn it, set aside. You can also buy toasted coconut that’s ready to use.
In a large saucepan over medium-high heat, add the other cup of shredded coconut, toasted coconut and coconut milk.
Lower the heat to medium-low, add maple syrup and cook for about 15-20 minutes until thickens and the milk evaporates.
Lower the heat to low and stir until you get a sticky mixture, be careful not to burn. For just a few minutes adjusting the heat to make sure not to burn.
Fold into almond extract and turn off the heat. Keep stirring or it will burn.
Using a spoon fill ¾ parts of your mold, refrigerate while you make the sauce. They will harden while the cool down.
Prepare the chocolate topping.
Chocolate Ganache Recipe:
Ingredients:
½ cup chocolate chips (I used 70% Cocoa)
½ cup of dairy-free or regular whipping cream
½ tsp almond extract or amaretto
1. Heat whipping cream until just hot.
2. Place the chocolate chips in a heatproof liquid measuring cup. Pour over the hot whipping cream. Let sit for 1 minute, then stir until the chocolate is melted and smooth. Add almond extract and stir.
3. Top coconut cups, add shredded coconut and top with almonds.
This Vegan Chocolate Banana Bread is moist, soft, fluffy, easy to make and so delicious. The recipe is rich and flavorful, making it the perfect decadent chocolate banana dessert. It can easily be made gluten-free too!
I’m so excited to share this recipe with you. As a baker, it’s hard to find the perfect texture when baking vegan baked goods. Some egg replacements don’t work great for my taste. I’m very picky with cake textures, my goal is to bake a fluffy and moist cake. This recipe calls for one large egg, but I wanted to veganize it. After researching about aquafaba, I decided to give it a try and the results were just amazing. I got a moist, tender, fluffy, soft, rich and decadent chocolate banana bread. The cake raised like a regular loaf made with real eggs and it did not change the flavor at all. This cake is a chocolate lovers dream!
HERE’S THE RECIPE VIDEO
I totally recommend the use of aquafaba for your vegan baking or meringue. This cake can also be made using gluten-free flour and sugar-free sweeteners. Just swap for your favorite ingredients.
This Vegan Chocolate Banana cake is:
· Rich in flavor and texture
· Healthy
· Dairy-free
· Vegan
· Easy and quick to make
· Requires a few ingredients
· Chocolatey
· Egg-free
· Great for breakfast, dessert or snack
· A chocolate dream come true.
Vegan Chocolate Banana Cake Recipe
This recipe is one of mychocolate cupcake recipes. I swapped some of the ingredients and added bananas. The original recipe calls for one egg but the aquafaba worked perfectly. You can also replace the sugar for brown stevia, splenda or coconut sugar. For a gluten-free version just use your favorite GF flour blend. If you’re looking for an easy banana bread try my One Bowl Chocolate Chip Banana Bread recipe or my Chocolate Filled Banana Muffins. Pour some peanut butter over your Chocolate Banana Cake and enjoy it!
Let’s talk about Aquafaba
If you don’t know about aquafaba. Aquafaba is the water or brine you find in canned beans. Yes, the water you usually rinsed from the can and poured down the drain. That water is a great egg replacement. Next time you open a can of beans, save the brine and whip it up with a hand mixer or stand mixer until it’s light and fluffy. I didn’t believe it until I used it. I used the water of a chickpea can to replace the egg in this recipe.
Three tablespoons of aquafaba is equivalent to about one whole egg, while two tablespoons of aquafaba is equivalent to about one egg white. Keep in mind that a can of chickpeas yields about 1/2 to 3/4 cup of this liquid, so about eight to 12 tablespoons.
Aquafaba is used to make a variety of recipes, including:
· meringues
· marshmallow fluff
· mousse
· frosting/buttercream
· mayo
· vegan cheese
· marzipan
· macarons
· ice cream
· muffins, cupcakes and brownies
I hope you try this recipe and like it as much as much as I do! If you give this recipe a try, let me know what you think! Leave a comment and don’t forget to take a picture and share it on my Facebook page or tag it #thehungrydragonfly on Instagram! I love seeing your creations!
1/4 cup vegan butter (regular if not vegan), melted and slightly cooled
1/4 cup melted coconut oil or vegetable
3/4 cup packed light brown sugar
3 tbsp Aquafaba or 1 large egg if not vegan
1 teaspoon pure vanilla extract
1 cup vegan chocolate chips or regular semisweet chocolate chips, divided
Instructions:
Preheat oven to 350°F. Grease a 9-by-5-inch loaf pan with nonstick cooking spray and set aside.
In a medium bowl, whisk together the flour, cocoa powder, baking soda, and sea salt. Set aside.
In a large bowl, mash bananas with a fork. Add the melted butter and oil and stir until combined. Stir in the brown sugar, aquafaba or egg, and vanilla extract. Stir until smooth.
Fold the dry ingredients into the wet ingredients, don’t overmix. Stir in 3/4 cup of the chocolate chips.
Pour batter into prepared pan. Sprinkle the remaining 1/4 cup of chocolate chips over the top of the bread.
Bake for 50-60 minutes, or until a toothpick inserted into the center of the bread comes out mostly clean. Because of the chocolate chips inside the cake you might have some melted chocolate chips on the toothpick, that’s okay.
Check at 50 minutes, just to be safe. Oven times vary. I use an oven thermometer to make sure I have the right temperature.
Remove the pan from the oven and set on a wire cooling rack. Let it cool for 15 minutes. Run a knife around the edges of the bread and carefully remove from the pan. Let the bread cool on the wire cooling rack until slightly warm. Cut into slices and serve.